
[PRACTICE]

I had a go at box modelling a simple character and a gun. With the teddy bear i started of well, but towards the end the vertices in the orthographic views were mis-aligned and it confused me on the placement of edges, and i couldnt straighten them as it ruined the mesh in the other view. With the gun i followed a tutorial on VTC, it gave me a better idea on how to box model with tips and tricks when modelling this technique.
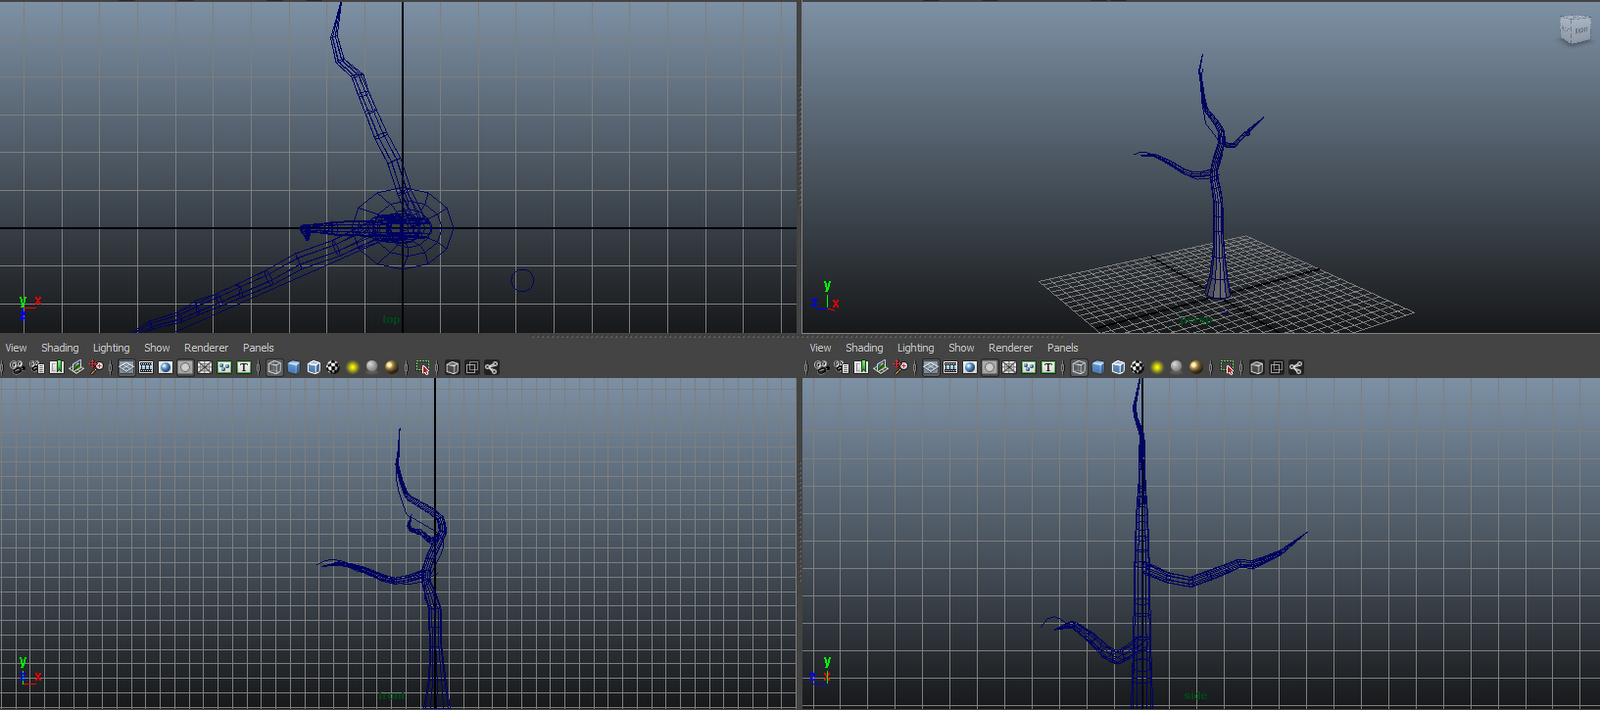
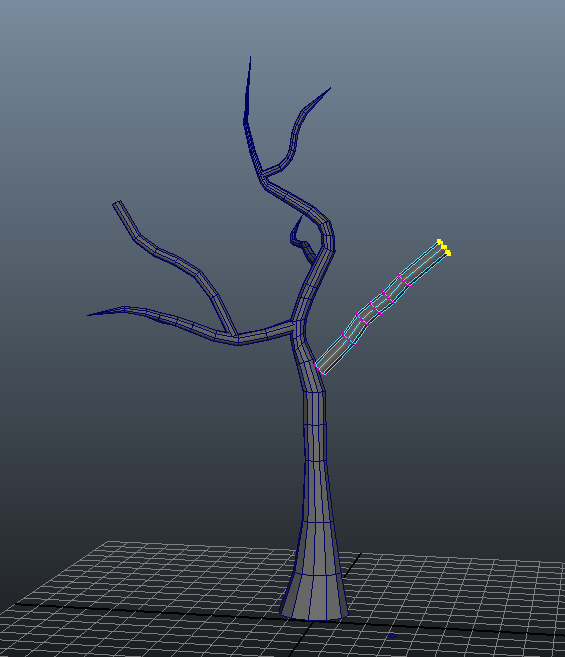
I learnt how to create a tree after watching a tutorial, which was quite simple using nurbs curves and converting it later into a polygon mesh. The main trunk i altered the shape of it using a lattice so it looks more organic. With the offshooting branches I resized the ends to form a point, giving it that sharp branch. This was great practice in preparation for creating game assets.
[PLANNING]

After teaming up with the programmers, and looking at each groups proposal i decided to work with 'phys-x dreamlab'. We have to come up with a game which is targeted to 14-19 years olds. The purpose of the game is to educate them on physics towards their gcse's.
My team are going for a futuristic theme, where it invovles two scientists (one male and one female) who go around to the different rooms in a laboratory, completing puzzles and challenges related to the topic of physics. [INSPIRATION]
The team were hoping for something like the game 'portal'. I looked at some gameplay of portal and also thought half life 2 is very similar as it is linked to portal. Watching some gameplay gave me an idea of the atmosphere they were hoping for, a futuristic lab scene which is kind of run down, along with a warehouse kind of feel.
I also looked at the film ultraviolet as it has a lot of futuristic interiors and exteriors which i thought were quite inspirational and could give me ideas on what to create. A lot of the forms in this film are quite organic, but i wanted to keep a 'boxy' kind of look to maintain a warehouse kind of feel at the same time.
Tron was a great inspiration, especially as a futuristic element. Two of the things which i enjoyed the most is the costume design aswell as the environmental aspect. The lighting is very certain and i wish to implant this kind of style to the enviroment and props to achieve the light 'streaks' shown throughout this movie, i could add this to the textures.
-Two scientists (male & female)
-RC Car (solar panel roof)
-Controller for RC Car
-Sci-fi furniture:
[tables/desks, chairs, light fixings, terminals, generators, servers etc..]
-Large battery
-Sci-fi styled doorways.
-Crates/boxes,traffic cones, concrete barriers
Me and the other designer decided that i will work on the male scientist, the RC car along with its controller,the different sci fi furniture and the large battery. You can see most of the concept drawings in my sketchbook.
Male Scientist


These were some moodboards for the male character as i was going to work on the male scientist. The kind of style they wanted was steam punky, yet to still look like a scientist.

I created many different concepts for the character and the final one being in my sketchbook. This was a digital attemptv to improve on my digital drawing skills.


This was the outcome of my attempt in creating the male scientist. I was really dissapointed as i could not create a sufficient enough model. I felt the blueprints let me down, and my lack of understanding box modelling was another reason. If i had more time to experiment and dedicate my time to making a character i would have probably made a more effective model.
Generators
From the moodboards i drew some illustrations (see more in sketchbook) including a digital one. You can see its very basic, as i didnt want it to be too detailed, as later on when modelling it would be more difficult for me:

I created many different concepts for the character and the final one being in my sketchbook. This was a digital attemptv to improve on my digital drawing skills.


This was the outcome of my attempt in creating the male scientist. I was really dissapointed as i could not create a sufficient enough model. I felt the blueprints let me down, and my lack of understanding box modelling was another reason. If i had more time to experiment and dedicate my time to making a character i would have probably made a more effective model.

 |
| Photo taken from call of duty mw3. |
This is the first generator test which i created, a pretty simple animation and model. Through communication, the programmers decided that this model was the best during the concept drawing phase.

This was one of the first early stages at me attempting to unwrap a model, now when i look back at this i can spot my mistakes and i can tell whether the model is sucessfully unwrapped or not.

These were the final texture maps on the model, the colour map (left) and the ambient occlusion map (right). I baked the ambient occlusion map by applying a surface shader and using the ao material from the mental ray list.

When animating the generator i wanted the rotators to ease in and ease out, i used the graph editor to make these changes accordingly.
 Final generator


 I also created another generator for variation. This was also quite a challenge when it came to unwrapping the uv's, but it was a good challenge as it would re-enforce the knowledge i learnt when unwrapping and gave me more experience to make me better at texturing. I was really pleased with this model, when it came to animating i thought of making it vibrate and i assume you would have to use an expression, but i never had time to experiment.

This was one of the first early stages at me attempting to unwrap a model, now when i look back at this i can spot my mistakes and i can tell whether the model is sucessfully unwrapped or not.

These were the final texture maps on the model, the colour map (left) and the ambient occlusion map (right). I baked the ambient occlusion map by applying a surface shader and using the ao material from the mental ray list.

When animating the generator i wanted the rotators to ease in and ease out, i used the graph editor to make these changes accordingly.


RC Car

A mood board and reference sheet of the possibilities towards the look of my final RC car.
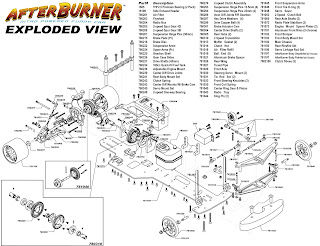
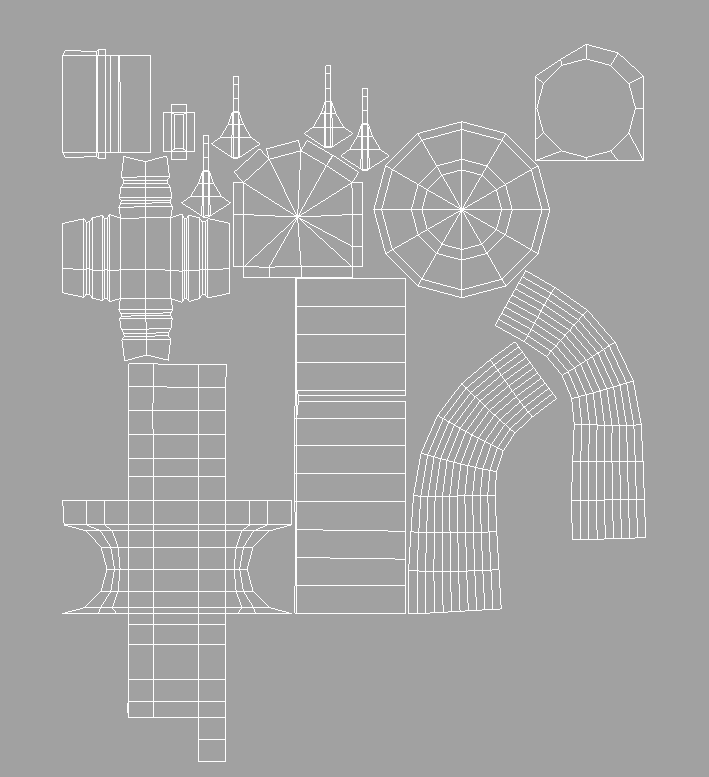
I looked at the mechanics of how a RC car was made. I wasn't going to make it too detailed, but looking at the inside gave me a better understanding on how i should model the outside so it looks pretty realistic. These references could also help me when animating.
I also looked at existing gameplay of where and how RC cars are used. A good contemporary example was from the recent call of duty: black ops. The example shown in this video clip gave me a better idea on what to take note of when creating my model, i.e if the camera angle stays at the back of the car, then i should detail the back more then the front. Also looking at the way it could be animated, especially showing the effects of suspension and braking.

This was my first attempt at modelling a RC car based on one of my designs. I wanted it to look like a buggy, yet maintain the qualities of a RC car. I created the frame and the base of the car, but then i got to a point where i thought, i don't want it to look like this, as it emphasizes a buggy more than a RC car, i wanted it to be more boxy and firm.

After the first attempt at modelling, i decided to go for a brand new look and style. So after drawing out another design i was happy to model this version. Once i modelled the car there were a few problems when creating this model. You can see in the above images i used the 'clean up' command in maya to locate where there are faces with more than four sides. It was pretty simple eliminating the four faces on the outside (top and bottom) as it was just a matter of inserting an edge to create quads around the model, but the face in the middle caused problems. Because of the way i modelled it, it had left stray vertices and double edges and i didn't realise, so i simply deleted that face along with any extra vertices, and then merged a planar face to the fill in the hole. This was the final look of the RC car, which i was happy with.

When it came to texturing, i had to make my textures as efficient as i could, as they play an important role, especially in low resolution models. The overall look is 40% more effective with a convincing texture on the model. So with texturing comes UV unwrapping. This was by far the most challenging aspect of maya for me, as it is not so much learning the principle of unwrapping that makes you good at unwrapping, but experience in unwrapping models and how to go about it. I had struggled a lot with this and really didn't know which way to go about it, even after following tutorials, but they were no good, as each model is unique so the same could not be applied for your model, although you could use the same technique. After watching a demo with my tutor which unwrapped my model for me, it gave me a better understanding and confidence to do it on my own, and when i did i came up with my own UV map. I am quite pleased with the result and this gave me a better understanding on how to unwrap in the future.

Once i created my uv snapshot i setup a psd network for the colour, ambient colour and specular nodes which made it easier for me to see things updated in real time. Once i started to paint on different textures i realised i put my seams in the wrong place. After this early attempt at texturing it gave me a better insight where i should have placed my seams to make things flow better in the texture and make everything appear linear.
In order for the tyres to move left or right when the car moves I created a mirror set of locators to control the orientation of the tyres. Using the aim constraint on each tyre to locator, and then those four individual locators parented to one main one i could control the orientation. The only defect with this is, the setup has to be in front of the car the whole time. I think there is a more effective way of achieving this using expressions.
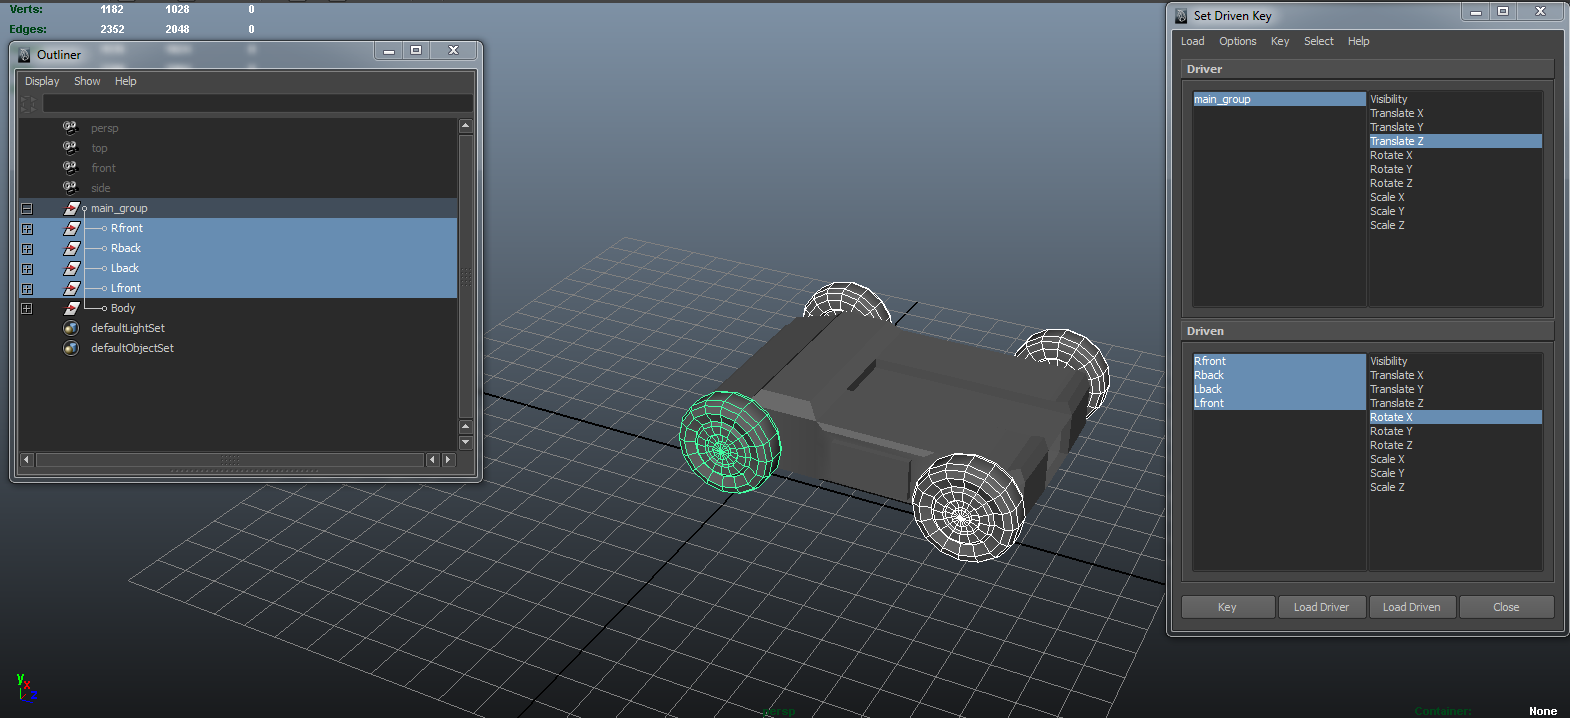
For the car to move forward I setup the wheels to rotate in the X axis when the main body of the car moves in the Z axis. Everything had to be organised into groups, the car being one group the individual tyres being in their own groups and everything placed into a main group. I used the set driven key to set this up. The only problem this created was because its a set driven key, the tyres will only rotate once, so using the graph editor i cycled the keyframes so they continue infinitely.

Final car

I had also made a controller intended for the RC car. Animating it was simple as i created two locators and created aim constraints directing the joysticks to the locators. In order for the constraints to work effectively you have to be sure the positioning of the pivot points on each object are placed accordingly, which is generally important when animating.
Computer servers

A mood board consisting of different styles of computer servers which i could use as references when making my own.

A digital concept painting i created, this was going to be my final idea for creating the servers. I wanted them to be different, and animatable. So i came up with the design where the body closes and opens.


The model was pretty simple to make. But animating it was not. Once i unwrapped the UV's I was able to go ahead with animation. The good thing about unwrapping first is i could see if there would be any distortion when animating. At first i thought of using blend shapes a simple method, but that caused distortion, I then later tried rigging the model, but that also caused distortion. So....
I thought about the type of animation i need it to be, so i did some research. After doing bit of research i realised i need to animate it in the same way as a telescopic locking mechanism.
So now i knew what i was animating, i needed to find out how. I searched and found a good working method, even though my animation would be slightly different i could use the same principles of using constraints.
After experimenting with constraints i found an effective way to animate the server, but i had to break the model up into four parts, so that the pieces fit inside each other, just how a telescope does.

I then connected the translate Y movement of both the moving parts on the server to a controller using set driven keys, to make it easier to control.

Final look of the server
Interior

This is the interior and furniture mood board. It has all the elements of a futuristic interior scene. I could use these as references to capture that certain, futuristic, atmospherical element which i'd like to achieve in my work.

Some quick polygon models i created to help generate ideas and see whether they would work as light fixings. I made an organic one (top) and one that is more structured (bottom). I prefer the hexagon clusters as i feel it is more futuristic, simple and effective.

I modelled this chair based on one of the designs i created. Using references to modern and futuristic furniture i came up with this design. Because the models have to be low poly for the unity game engine i have not smoothed the model, another way to get the shapes smooth is by making the normals smooth.

References to industrial fans

I modelled my own version of an industrial fan.

Animated fan with rotating fan blades.

With the fan i wanted it to look old and rusty, even though the other objects were quite fresh and shiny looking. I wanted to have a dirty object to experiment with more elaborate textures. Especially when it comes to specular map, which i found fascinating and most effective on this model.

Final industrial fan


Unfortunately i never had time to finish texturing many objects, this chair being one of them.
Rigging

I was following a step by step tutorial to create a working rig. The start of the rig consisted of using guides to help snap the joints in place, a great feature to help someone get into rigging.


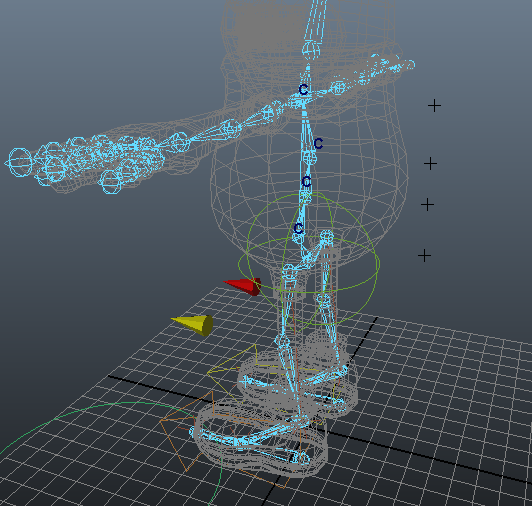
Using ikspline to create the spine movement, and then for the controllers adding clusters on each point and also adding display handles for further control.

Video reference to see how the fingers move.
The fingers i used set driven key, which was quite ideal as the fingers are restricted in movement to an extent.

The first walk cycle i made using my rig, i found it to be quite robotic as there was no secondary movement.

The next stage would have been painting skin weights and the binding process, which i never actually got round to. (model was provided by the tutorial i was following)
We started off with our group formation with the programmers. We aimed to make a game to teach children, physics GCSE level. There were four programmers and two designers, me being one of the designers. At the start we were clear in what had to be done, but the start was slow as the programmers group leader didn't give us much to work with. Every week it would be the same thing, concept art, sketches and frankly it got boring the same thing over and over again. Throughout the middle of the project the new group leader took over and provided us a list of things to be done, making it more clear for us to begin designing models and finally all systems were go. Communication was good at this point. Me and the designer split the workflow making it more easier for us to handle.
After a late start and providing the programmers with our concept art, they chose what worked and what didn't. At this stage I started modelling the different objects, mostly being props. It was kind of disappointing as i really wanted to create environments as its something i enjoy the most, but the programmers told us they would create the environments in the unity engine. After a certain point of building the models and wanting to show to them for feedback, communication with the programmers broke down again, this time it felt like they didn't want our work or needed it, after several attempts of trying to communicate with them through facebook, through meeting i finally gave up. So at this point i felt really disheartened and annoyed. But i had to continue working for myself.
Working in maya itself is a great challenge, with a steep learning curve, you can't figure it out yourself, you literally need someone to spoon feed you maya. With maya covering a large field of work area; modelling, animation, effects, rigging, rendering, lighting there is so much to learn and i felt my weak points before the project were texturing and rendering, and my strongest being modelling. Regardless of my current knowledge in one area i knew i had to concentrate on modelling, texturing and animating for the game brief.
I practiced various modelling techniques for game models, i.e box modelling. When it comes to modelling for games the biggest limitation is poly count and making sure each face is in quads, otherwise it would cause problems in the game engine.
Texturing was something new to me, as i had barely touched on the surface last time. This time i concentrated on texturing a lot, i was really determined to understand how to texture effectively to achieve a model the way i want it. In this process i learnt UV unwrapping one of the biggest challenges for me, which i overcome towards the end. I knew of 3rd party programs which could automatically unwrap an object for me, but i wanted to learn the ins and outs of doing it in maya which was a painstaking and time consuming task, but in the end it was worth it, i can now confidently unwrap an object knowing and understanding where to place seams and to make sure the UV's are an accurate 2d representation of the 3d object.
Animating in maya is like two ends of a spectrum, either its too easy or too hard. Objects like the generator were easy to animate, as it was just a matter of setting up a cycled rotation on the object which is needed to rotate. But when it came to animating things like the car, it became difficult, i.e setting up constraints and using expressions to make the tyre move accordingly with translation and rotation movement. I never got the chance to overcome this problem as i felt the answer lied in expressions, and expressions are a weak point in me, i hate the idea of programming, and expressions reminds me of that :(. I looked into it and found a tutorial, and after following it, it just never worked out, typical. Overall with the built in animation tools in maya i have become confident in using the trax editor (great for looping clips), graph editor (great for changing timing and making something ease in or ease out), set driven key (good for fingers), and blend shapes (which is good for facial expressions amongst other uses).
The concept art and moodboards/refrences held all of my visual content for this project, I knew what i was doing in my mind, but its the matter of whether my ability and knowledge of maya will make ends meet, and with maya there is guaranteed to be bugs and unexpectances.
I had been reading books to help deliver my working methods. One of the books which helped me with texturing was 'Creating the art of the game', a great book which gave me a better understanding of what different kinds of texture maps are available to the world of games and it helped me get through many problems i incurred when creating my texture maps.
Many online resources helped me achieve and overcome any of the challenges i incurred while producing animation. I think one of the main problems was the pace the project was going at, it was very slow and i had to pick up the pace towards the end, with mixed emotions of confusion on what to do, and annoyance towards the programmers. Even though i was disheartened i still learnt valuable things such as rigging, texturing, modelling with limitations which is a great skill set to know and have, this experience has been a bad one, but its only made me better in understanding maya, a very large program and for that I'm grateful, as it has also given me a better idea of what i want to do and what is my strongest point, which i feel is modelling. My next steps in maya would be learning how to render and achieve lighting effectively.
Despite the communication with the programmers being like a rollercoaster ending in a crash, I would have liked to see my objects in the end game functioning properly and it would have been good to have that communication and experience of working in the game industry where things most likely go back and forth until its working properly.
Problems such as my limitation of understanding maya and the main factor being time, even though it seems i had plenty of it, i thought i had effectively managed time in terms of creating what i wanted to, but i was wrong. Some of the things i wanted to create i haven't even made, such as the character and i would have liked to create more props, including environments which i could have made, but when i realised i have to continue working for myself it was too late to work on an environment and i thought i should continue working on the current work i have and improve it.
I really enjoyed making the various props and learning animation within maya to a more detailed extent. This experience has only given me more knowledge using maya. I feel the strongest bit of my work is the RC car, that has worked out really well. Also the texturing is quite effective especially with some of the objects looking like sets, as they share that futuristic theme and similair colour traits.
Overall i would say the outcome is good and has taught me a lot. Learning different things from working in a lazy group to technical aspects of maya, but most of all i feel stronger in texturing. Hopefully i shall continue to grow my knowledge on maya as i find it an extremely useful tool which i have grown fond of, and lets hope i become fluent in using it.
In terms of animation principles the following apply:
* Squash and stretch (not used but could definately be applied for cartoony styled animation)
* Exaggeration (not used in my work but could be applied)
* Anticipation (could be used when rigging)
* Follow through and overlapping action (again not used, but could be applied to when animating more complex)
* Arcs (Used frequently when animating as most things follow a natural arc.. i.e limbs of a body when rigging)
* Ease in-ease out (I used this principle for the generator to make it look more believable)
* Timing (most common use, determines how the animation will run, timing the keyframes and movements so they all correlate together)
* Secondary action (Used in character animation, i.e head movement side to side when walking)
* Staging (Not used but could be used for a 3D scene)
* Straight ahead/pose to pose (Straight ahead animation would be quite time consuming and would only be useful if one has to animate in a particular way, i.e organically.. but pose to pose is the frequent used option in 3D animation)
* Appeal (Could apply to props and i believe they do have appeal, but that is down to looks more than animation, in an animated rig it could apply to the way the walk cycle is, if it has personality or not)
No comments:
Post a Comment