
[PLANNING]
After reading through the three different scripts we decided to go for screen play number 2. Once i read the script i started to dissect the script by highlighting two seperate parts, one regarding characters/expressions and the other on setting/place. This would make it easier to create our sets/characters when referring to the script.
|
|
|


After seperating the script we decided to split the group into two to take on seperate parts and bring the formation of the script together like that. Me and Ellen decided to take on the role of storyboarding and creating the sets/environments, while the remaining three members would create the characters. When i created my storyboard I vaguely looked into angles and lighting, as i thought it would be more ideal to get the visual structure out there first rather than taking the time up to get the right angles and lighting. For the setting I used visual references to get an idea. There are four different settings mentioned in the script:
1. Outside of the base is mentioned as a mountainous clearing with a small shack, surrounding forests and industrial equipment:
 |
| Mountainous clearing [Game inspiration: Red dead redemption] |
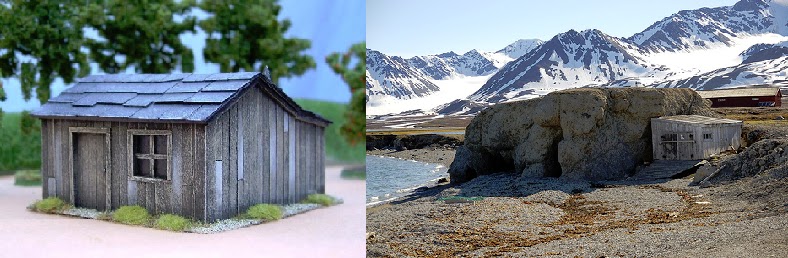 |
| Small shack |
 |
| Industrial equipment |
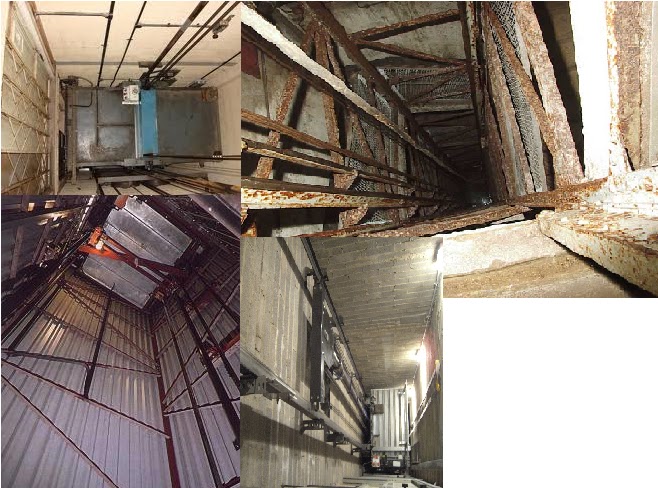
2. Lift shaft that goes down to the base:
3. Underground lab base:

When we went to the wood workshop, we saw a lot of industrial looking equipment which we thought would be good for our lab set to look like in a similar way.
 |
| Industrial equipment references |
Reference of a lift
INSPIRATION
We want to use this style of recording for the part where the scientist strikes the ice. We would use this video's camera technique by doing the blackout part when the sasquatch breaks free, and then maybe follow the broken parts of the ice.
 |
| Fantastic Mr.Fox |
Fantastic Mr.Fox has a lot of scenes which involves underground themes. I felt that it would be relevant to our work, in the screen shot you can see a mountainous clearing which we could use as inspiration.


The yetis from 'Zelda Twilight Princess' are inspirational and we can use them in reference to creating our own characters. We also decided to change the script a little, by using three yeti characters instead of a whole group of yetis. The three yeti's would be a family reunited again; the mother, the child and the yeti which is the father released from the lab. We also would show the yetis hug at the end to show them reunited and show it in the similair style in which its protrayed in the game, with hearts 'popping' out.
Storyboards (Drawn by Ellen)
 |
 |


Set plans
 |
| Plans of the lift shack + lab, drawn by Ellen |
 |
| Plans for the mountainious clearing |
3D Render's made by Horvath


Acting
These are some scenes of us acting, this helped us understand and give us an idea of what we got to animate when the time comes, it gives us a reference when using our armatures. It also gives us an insight to camera angles.
[PRODUCTION]
Mountainous scene (long shot)

This was going to be the background for the long shot scene. I painted the background to make it look like a mountainous clearing, to help convey perspective and give atmosphere to our work.
This is the production of the mountainous clearing. I started of by a wooden piece which i cut into two, using a saw. The top panel i painted into a landscape design. While the botton base was going to hold the shack and the trees. I first applied mudrock into a shape of a rocky mountain to make it blend in with the background, I then applied a lick of brown paint onto the mudrock once it had dried.
To create the trees i had got sponges with two different textures to give a variation to the way the trees look. The rough textured side of the sponge had a dull dark green colour which gave a natural tree-like colour, but the softer side had a yellow tone. I spray painted the yellow ones using a vibrant green once i attached the sponges to little pieces of wooden stick's using adhesive glue. This was quite an effective method for creating little trees. Finally we created a miniature shack and placed the odd screws and bolts around it to give the feel of industrial equipment, and also spread damp sand to give an earthy texture which worked quite well. We then stuck the two pieces together, in a 90 degree angle.
Labaratory base
This was the laboratory set which we made. We used panels of wood and stuck them together according to our set plan using wood glue. We left a slot in the middle to put in and take out a panel as room seperation, so we can have more flexibility when we are filming. Once our base was put together we added mudrock in certain parts, such as the corners, this was to give the effect of a rocky underground lab.
We wanted the place to be quite gloomy, so we painted it a dark grey tone, applying many layers of paint mixed with pva glue, the mudrock we painted a shiny grey to give a dull reflective shine, this gave the effect of a damp/wet lab.
To give more of a lab atmosphere we added many different elements to give it that feeling, such as skull artifacts sitting on the shelves, a machine with a screen and buttons, pipes going into the ground/walls, a fossil, images of yetis/biological matter, blueprints, maps and glue hanging from the mudrock to give the effect of water dripping. The main components which the scientists would interact with were the table, the chairs, the radio and the ice block.We made the table and chairs by using wooden pieces and attaching equal legs to the certain parts for balance, and then painted over it. The radio was simply a little wooden block which we painted over and added little bits for the buttons. The ice block we created using a coffee jar, which we poured hot melted wax over to give the effect of ice.
Lift
Our lift was made by Ellen, she had made the structure by using wooden sticks in a cross hatch effect onto a wooden base, and then covered the surrounding of it by mudrock which was then painted grey. The wooden sticks were painted a shiny grey to represent metal. We also attached a little box at the bottom to represent the actual lift, which was also connected to metal wires for effect. The lift would sit next to our laboratory set when filming.
Shack

This was our larger shack which was going to be used for two scenes. It was made with a cardboard base, and over the cardboard base we used little wooden panels to cover it and then painted varnish over it. For the roof we just placed a black plastic cover which folded.
Forest

We used two different parts to convey the forest scenes. When the scientists were running and we did a close up of their feet, we used a patch of grass on a green backdrop.
When we were filming the yeti scenes we used our other forest, which was made up of real plants stuck on a round board.
Characters


Tests
These were some of our tests which helped us decide on what to use on the final film, i.e. better camera angle, better lighting, how to move the armatures etc...
Milo recording

We used the milo motion control camera for one of our scenes, we thought it would be ideal and very effective for the lift scene, where the camera follows the lift shaft down to reveal the laboratory in a twist motion, we thought it worked very well and were very excited to see it being used on our work.
 |
| Production |
 |
| Final |
This is the production of the mountainous clearing. I started of by a wooden piece which i cut into two, using a saw. The top panel i painted into a landscape design. While the botton base was going to hold the shack and the trees. I first applied mudrock into a shape of a rocky mountain to make it blend in with the background, I then applied a lick of brown paint onto the mudrock once it had dried.
To create the trees i had got sponges with two different textures to give a variation to the way the trees look. The rough textured side of the sponge had a dull dark green colour which gave a natural tree-like colour, but the softer side had a yellow tone. I spray painted the yellow ones using a vibrant green once i attached the sponges to little pieces of wooden stick's using adhesive glue. This was quite an effective method for creating little trees. Finally we created a miniature shack and placed the odd screws and bolts around it to give the feel of industrial equipment, and also spread damp sand to give an earthy texture which worked quite well. We then stuck the two pieces together, in a 90 degree angle.
Labaratory base
 |
| Production |
 |
| Production |
 |
| Final |
We wanted the place to be quite gloomy, so we painted it a dark grey tone, applying many layers of paint mixed with pva glue, the mudrock we painted a shiny grey to give a dull reflective shine, this gave the effect of a damp/wet lab.
To give more of a lab atmosphere we added many different elements to give it that feeling, such as skull artifacts sitting on the shelves, a machine with a screen and buttons, pipes going into the ground/walls, a fossil, images of yetis/biological matter, blueprints, maps and glue hanging from the mudrock to give the effect of water dripping. The main components which the scientists would interact with were the table, the chairs, the radio and the ice block.We made the table and chairs by using wooden pieces and attaching equal legs to the certain parts for balance, and then painted over it. The radio was simply a little wooden block which we painted over and added little bits for the buttons. The ice block we created using a coffee jar, which we poured hot melted wax over to give the effect of ice.
Lift
 |
| Final |
Our lift was made by Ellen, she had made the structure by using wooden sticks in a cross hatch effect onto a wooden base, and then covered the surrounding of it by mudrock which was then painted grey. The wooden sticks were painted a shiny grey to represent metal. We also attached a little box at the bottom to represent the actual lift, which was also connected to metal wires for effect. The lift would sit next to our laboratory set when filming.
Shack

This was our larger shack which was going to be used for two scenes. It was made with a cardboard base, and over the cardboard base we used little wooden panels to cover it and then painted varnish over it. For the roof we just placed a black plastic cover which folded.
Forest

We used two different parts to convey the forest scenes. When the scientists were running and we did a close up of their feet, we used a patch of grass on a green backdrop.
When we were filming the yeti scenes we used our other forest, which was made up of real plants stuck on a round board.
Characters


Tests
These were some of our tests which helped us decide on what to use on the final film, i.e. better camera angle, better lighting, how to move the armatures etc...
Milo recording

We used the milo motion control camera for one of our scenes, we thought it would be ideal and very effective for the lift scene, where the camera follows the lift shaft down to reveal the laboratory in a twist motion, we thought it worked very well and were very excited to see it being used on our work.
Lighting


We felt the best solution for lighting our lab was to have one room a cold blue colour, while the room with the ice has a more eerie purple cold feeling, this gave us the best atmospheric value in terms of lighting and colour.
Animatic
Dope sheets made by Ellen Kean
Our animatic consisted of scenes of us acting as well as some scenes of animated tests. We had to create the animatic this way as our characters were not fully developed, nor were our sets, so we used a mix of live action and animated footage. This gave us a good insight to how our animation would potentially run, it also gave us the ability to pinpoint some problems within our original storyboard concept, which led to us changing some scenes.
[Final]
After a gruesome 6 weeks of planning, production, construction, filming, editing, this was our final outcome!
Throughout our journey we had faced many problems, one of many being time. We started of planning and took quite a lot of time planning because we wanted a clear vision on what we were going to make and how we were going to make it. We ended up lagging behind on the production, but we eventually quickly caught up with a lot of time and effort being put in to our sets and characters.
The characters were made by Horvath and Memoona. The yeti's armatures didn't have to be too flexible which made them quite compatible with our filming, but the scientists had to be able to move, stand, sit and balance. The first set of scientists which were made, were quite rigid and did not balance, nor stand very well. This led to the production of our second set of scientists, which was quite a nuisance as it lost time in filming and potentially editing too. The second set of scientists ticked the criteria mentioned above, but as a result of lost time, this led to their visual appearance being affected, and them looking a bit plain. Another problem which this caused was that their facial expressions were limited, and the only way to determine them was by moving the eyebrows and by making a hole in the mouth. The overall ingenuity of the characters was quite successful, especially the yetis which had a good appearance.
It was mine and Ellen's responsibility to create the various sets. While Ellen concentrated on creating the lift shaft I was creating the mountainous clearing. I had to paint the background in an artistic style of a mountain scenery. The problem i occured when painting this was that the material on the wooden panel was quite smooth and shiny, this led to the acrylic paint not sticking onto the surface, so i had to put on a few layers of paint before i could actually paint the scenic view, which came out effective to an extent. Also when i created the trees for the bottom panel, I was using sponge pieces to stick onto little wooden sticks using adhesive glue, this was weak at times and prevented the sponge from sticking, therefore I i used a glue gun which is a much more stronger substance.
We had originally planned on filming the forest scene outdoors, but later realised it would be more ideal to create a forest rather than film outdoors due to lighting. We had gathered many plants from outside and stuck them onto a rounded board. When we started filming some of the plants had died, but it wasn't a problem, infact it was a good effect because some of the plants thinned out and we thought there was too much foilage around for the camera to see inside, and this actually aided us. The only nuisance which this caused was when we were filming, little leaves would be in the way of the camera and would distract the attention of the viewer, as it would keep spinning around on a thread, and we would realise after recording half way through, causing us to start again!
When we were constructing the base of the laboratory we intended to nail the different wooden panels together to create a strong base, but due to lack of nails and help, we had used wood glue instead which worked just as well to keep the base structure secure.
When we started filming we had problems left right and centre. We had to use a HD camera, as the milo scene was filmed in HD. The problems which occured were; camera would run out of battery, the camera lead wouldn't reach the computer, camera would not turn on, computer running slow. These technical annoyances would take up time and prevent us from filming. This caused a lot of frustration and made me lose interest in stop motion totally, I was enjoying making the sets but when it came to filming i had lost patience.
We were going to put our theory into practice, everything we planned for came down to this. Things started to look different when we started filming.
The mountainous scene was difficult to line the camera up, because it was small and perspective came into play. Causing us to see unwanted objects in certain areas, we had to zoom in quite a bit to demolish these unwanted objects. If i could create this again i would create it much bigger, especially longer horizontally, so the width of the cameras lens would fit well with the set.
When we started filming the laboratory scenes, the tables one leg had broke, so we had to just balance it out without using glue as we never had any glue. We didn't want to attach the table or the chairs to the set so that we can have flexibility when recording. Also when we had to have the scientist sitting down on the chair it was quite difficult making him stable in that position, as he was quite heavy and did not have enough support to balance him on the chair, so we took a lot of time trying to make him sit down, even if it meant sticking his butt to the chair with blu tack, which we used a lot of when we were filming for various different scenes to keep things in place. The laboratory set was quite good, my only problem with it would be the size, it is quite small, and things looked quite cramped inside, including the characters if i could create it again it would be much bigger.
To prevent our lighting being changed, we had placed markings on the floor to realign the lights if we had to record a scene using that same lighting the next day.
The scenes were edited by Horvath. I find the editing quite effective, but there is some repetition of the shouting which does make the video seem a little dull. Also there is too much fade in and fade out from the cut scenes which also makes the film seem repetitive.
I really enjoyed making the set, and i find that our stop motion was quite successful even though we had to pick up the pace a little and go through many obstacles. Some of the strongest things about the project are: the milo scene, the laboratory itself is quite effective and looks like an underground lab especially the idea of the middle panel which comes out, this made it easier for us to film, the yeti's were quite nicely constructed, our planning work was quite strong as we didn't stray too far from our original storyboard/ concept, I also enjoyed the scene where the siren goes off I found that quite effective. This stop-motion project has taught me a lot and I, frankly am not really motivated when it comes to stop-motion, it requires too much work and you have to rely on other people for this to come together, and that can be a good thing, but its a bad thing when people don't come in or things don't go according to plan.
The principles we took into consideration when filming were:
* Anticipation
* Follow through and overlapping action
* Arcs
* Ease in-ease out
* Timing
* Secondary action
* Staging
* Straight ahead
* Appeal
No comments:
Post a Comment