
The first step was to make a plan, a storyboard. This would help lay the structure and reference of the entire film. I conveyed my idea into a storyboard and a plan of the individual shots which concentrated in lighting, angles and shooting styles.
 |
| Shot plan |
 |
| Storyboard |
These were the scenes shot on the milo from tuesdays shoot. I didnt manage to finish the whole storyboard, but i got some of them done.
Scene 2a
Scene 2b
Scene 3
Scene 4
Scene 6
I was happy with my shots to an extent. Some of the shots didnt go exactly according to plan but thats due to limitations with the milo and space within the green screen room.
A thing to note about recording footage is if you never finished all the scenes and you need to record again you have to wear the same clothes and basically look the same again in order for consistency.
Desperate times call for desperate measures! After my green screen shoot i had to record more footage, but the green screen room was fully booked until december so due to time constraints i came up with the stupid idea of recording behind a red screen. The outcome of this can be seen below:

Very poor attempt! Due to the amount of redness in the skin, it will also get keyed out along with the background colour, so unless your an alien its better to stick to green screen.
[Scene 1]
For this scene i had a mental image in my mind of what i wanted it to look like. I felt it was a great opening, it would keep the viewer intrigued as to whats going to happen. I kickstarted this first scene into Vue xStream for a concept to develop.

I setup a simple terrain within Vue, but the main focus was the atmosphere and lighting. As i was going to replace the mountain with a more detailed and controlled model created in maya, which i could render separately or import as an obj model.

So i created the mesh in maya, but this was just a base mesh which had to be more detailed.

I imported it in to vue to check if it the silhouette of the mountain works well against the lit background, i was happy with the shape.

With the base mesh i uv unwrapped it and then took it to zBrush and started sculpting the shape and texture into the gemotery. As this now would be a high poly mesh with all the detail i would export the data as a texture map (normal map) which would then be applied onto the low poly version, like an illusion of geometry that isnt actually modelled.


I created the normal map out of zbrush, which i didn't like when i applied it to the low poly model, so i thought ill try turning it into a displacement map. I used 'crazybump' which is a tool to convert maps into different types of maps. After creating the displacement map i felt it wasn't what the mountain needed either. I had to resort to something else.
So i experimented with displacement maps within maya itself. I setup a displacement node graph within the hypershade of maya and I applied a 2d texture to the materials displacement attribute, found in mayas default texture list (crater).


Setting down the dispalcement to a reasonable amount.


I then created this texture combining two different textures together. This was more effective. I felt it had the richness in the mountain that i initially wanted.

With a colour and displacement map, this model was ready to be rendered and lit.

After getting some workshops on lighting, i used that understanding to setup a three point lighting system. i lit the model in maya using two directional lights and one point light. The point light being the strongest intensity in order to recreate the sun. I placed the point light behind the model so that the model is luminated from behind, positioning is important.

Final render ready to be composited.

To further enchance the shot i decided to composite birds flying. I downloaded a clip of an eagle, scaled it down, green screened it, duplicated it (to make it look like a flock) and animated them moving forward. For variance i animated them at different speeds, rather then making them all look generic.

Final scene which is going to be composited later on.
[Scene 2a]


For this test i created all the elements in photoshop hence it feels flat. After getting feedback it was a good idea to start again. I wanted the scene to be less detailed, more smoother, cleaner with depth. So i decided to create it using 3d models to give more depth.


I experimented in zbrush again to create the elements, but i wasn't entirely happy with the results.So i turned to vue and created the backwall in vue. A simple setup with simple materials and a light setup applied to it.


This was the model for the mountain ramp which i would be walking up. Basic model at this stage.

Again i took it to zBrush and painted detail to it. With my previous attempt with the mountain model, i wasn't too pleased with this one either. Perhaps its because of my limitation of zbrush and going into the depths of it.

As i was going to explore ways to create rocky depth, i used photoshops 3D features to experiment displacement map creation.


for the textures i used three different types, a diffuse, a colour and a bump. A diffuse texture helps emphasis light in areas which are white. The colour is the pretty self explanatory. The bump map adds details of extrusion depending on what the value is, black extruding in and white coming out. The bump map is just effecting the texture and not the actual model itself so its a good way to add details on a low poly model.

Here is the final model with the textures applied.

To add more detail, i wanted foilage to be hanging of the mountain so i created the foilage in maya using painting effects and did a seperate render pass so i could adjust the foilage colour and various different attributes seperately to the mountain.


So i added ambient occlusion to the textures which added the shading and depth i required.

Finally i composited it all together, the back wall, the mountain ramp, the foilage and the keyed footage. In after effects i decided to relight the scene using after effects built in lights. As they are a 3d feature i had to turn the layers into 3d too.
After colour correcting and adding a focus effect of the camera here is the final shot for this scene.
[Scene 2b]
This scene was going to have a 3D object placed in, so i needed to track the camera data in 3D space.


I had so many options for tracking. I had nuke, pixel farms pf hoe, and the camera tracking plugin for after effects. I ended up using them all just to try and get a good track for my footage. For nuke i was pretty much stuck as i had no understanding of how the program works, i followed a tutorial to get the data and also export it into maya, but the exporting stage wasn't working due to a bug in the script so i had to resort to pf hoe. Again same problems with pf hoe, and it wasn't happening with just this scene, although this scene was the worst to track. It goes to show my recorded footage wasn't an effective track, and maybe i should have thought about the placement of the tracks more.
Another problem with tracking was myself moving in the shot, it caused conflict with the camera movement, so once i managed to get some tracking data and exported it to maya for a test i realised that the tracking data was using me, and because i was moving slightly it used that as the position of the camera, which is not good.

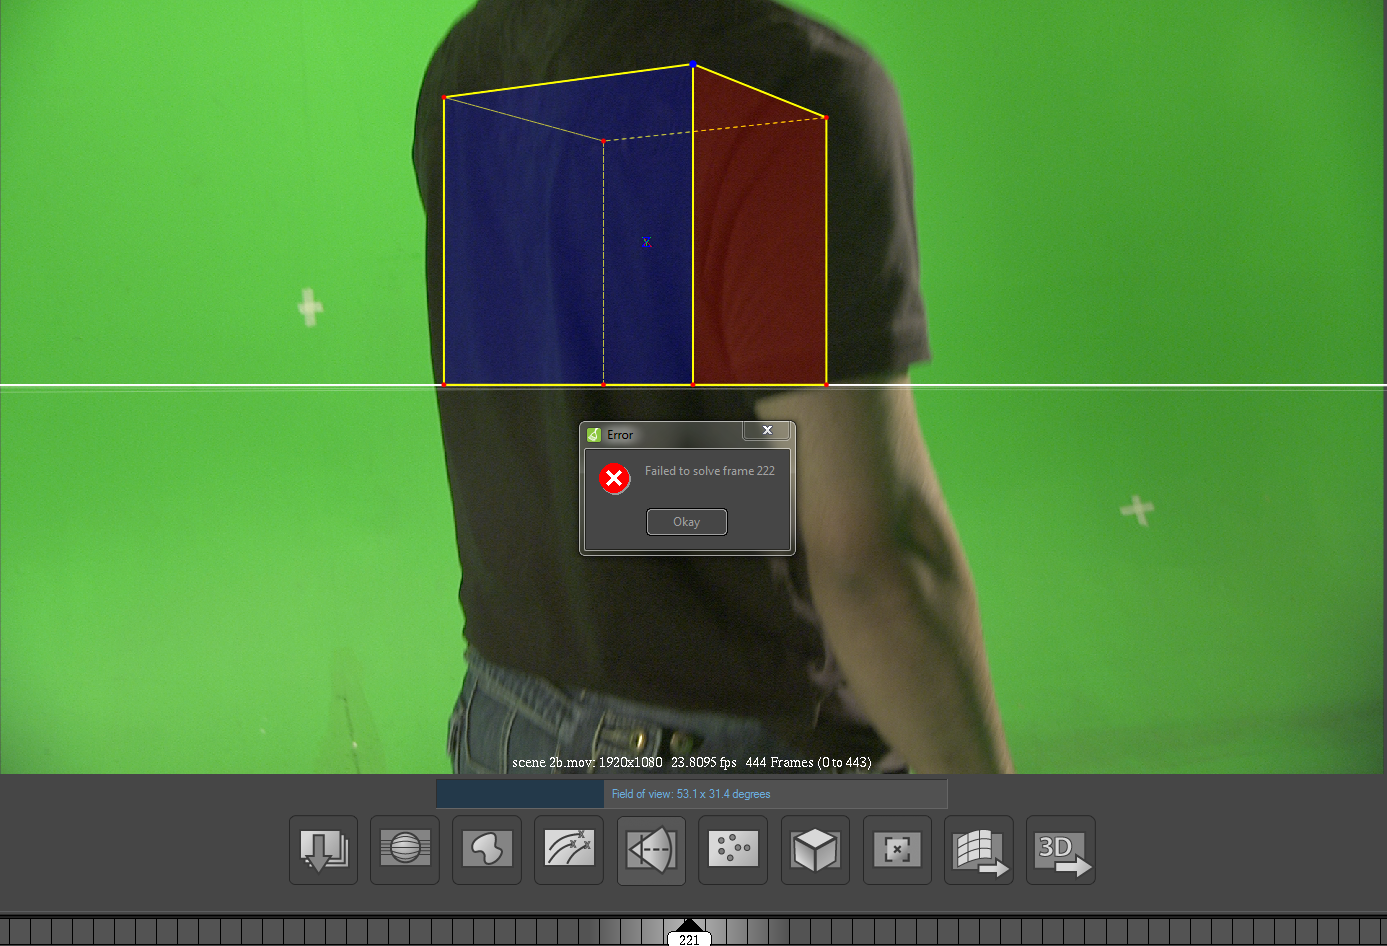
Unfortunately this is all i got as far as this scene goes, due to time constraints and everything else i was working on, this scene never got the chance to develop and remained in the stages of buggy tracking.
[Scene 3]
Again another scene i never got the chance to work on :(
[Scene 4]


For the ground plane of the mountains floor i wanted it to be patchy. Slightly rocky with grass. A good texturing technique was to paint parts of the plane white and other parts black, the black would essentially replace one texture and white the other, the greys would blend the two together. This is all setup using nodes within the hypergraph of maya. I found this an effective texture and the method to set it up was quite good in terms of control.


I created the clouds in Vue. I find the clouds to be an effective part of my piece. I could create the clouds the way i wanted to in terms of lighting, shape and angle, with so many options in vue the possiblities are endless. I wanted the right kind of harmonious balance in my piece and i felt the clouds really help emphasize that. Also with post production i could have easily altered the clouds to give a different mood altogether.

Final render of the clouds i chose. I rendered it quite wide, almost like a panoramic view as the view from above leaves a wide angle visible in terms of perspective. I also made it wider than the actual film size as i could have played with the movement of the clouds within after effects if i wanted them to be animated.


With this scene i was also having tracking problems, so in order to improve tracking coverage i had the idea of contrasting the clip in order to pick uo the tracks better. After numerous attempts of tracking i managed to get a track but it was only half done, and i had to use this track, i couldnt afford to shoot the footage again as i would have been wasting time. So i just animated the remainder of the camera move hence why towards the end it looks pretty controlled.
Some tests with the tracked data, also looking at composition and the overall look of the scene.

Visualisation was great in photoshop. A look at colour correction, composition and placement of things.

Final render of the ground. I added maya fur to create the grass, which was quite effective.
Only problem with this is rendering. Because i was using maya fur it took so long and i had 600 frames to render as a sequence. I managed to render 250 frames and it took over 48 hrs! So in order to meet the deadline i had to render the remaining frames using less quality. Hence why in the final animation you can see the first few seconds of this clip are in good quality, but after that the quality degrades and you can see sharpness of pixels in the edges, which isn't anti aliased.
(Matte painting element)

A rough general idea of the matte painting, i decided to use rounded water placements rather than a river.

I created the far mountains in vue for the matte painting and rendered them as a panaramic.

For the ponds i started created them in maya, i thoguht i could render it effectively and it would achieve the realism i wanted.


Final animation
No comments:
Post a Comment