Andrew
Kramers website (www.videocopilot.net) are a great source for
tutorials, i took a look at some keying techniques to integrate live
action footage successfully to a background plate.
http://www.videocopilot.net/tutorial/basic_color_keying/
I also came across this great website which gave a few hints and tricks into motion tracking, and it also gave free green screened footage to play round with, which was perfect for me to learn on.
I also came across this great website which gave a few hints and tricks into motion tracking, and it also gave free green screened footage to play round with, which was perfect for me to learn on.
So i downloaded one of the greenscreen shots and thought id start with this shot:
A few of the things that are going to be an an issue with this shot are:
- The green thats spills on her.
- The tracking markers in the back could be difficult to pick up (difficult to see in the video, but you can make out the shapes, they have a more lighter green tint)
- The thinner strands of her hair being blown about will be difficult to pick up.
Using Andrew Kramers tutorial as a reference, the best way to key out the footage was using 'keylight' in after effects. It is the most effective and suitable plugin in after effects.
 |
| (click to enlarge) |
 |
| Screen matte (click to enlarge) |
White = The part we are keeping (100% opacity)
Black = The part which is going to be removed (0% opacity)
Anything in between (grey) will be any value between 1-99% depending on the grey.
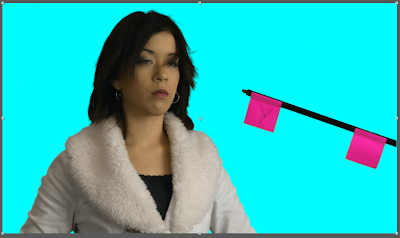
So in order for this to be most effective, we have to make sure all of the girl is white, and anything surrounding her is black. (the pole hanging by her with two notes attached are for tracking purposes and will be dealt with later, it does not matter if they stay in the shot at this stage, what is important is that all of the green is keyed out for now).
As you can see in the above matte screenshot there are greys on her, so we have to eliminate them and make sure they are all white so she is 100% opaque. There are also greys being caused by the lighter green tracking marks in the back which 'keylight' hasent picked up, as they are a much lighter green which we have to remove and make transparent.
After tweaking some of the settings to increase the gain on black to remove some of the grey areas and tightening up the white, it resulted in a matte looking like this:
 |
| (click to enlarge) |
The problem i had now was it was too defined, you can see the hair loses its naturality, and the edges are too sharp and rugged.
So i had to find a balance which maintained the intricate details found on her, yet removed majority of the green in the back. So after tweaking some more, i managed to find a good balance but the problem was some of the tracking points in the back are still visible (the grey spots).
Keylight wouldnt pick up on them so i decided to add another keying effect on top, called 'colour key' which removes a certain colour (similar to keylight, but less technical) which eliminated those tracking points completely to give me a clean plate.
 |
| Final result |
This is the clean plate, if you notice the parts which were originally transparent have now been filled to an accurate representation of colour which keylight helps achieve. i now had to remove the pole with the notes attached. It was a simple operation of rotoscoping it out, a basic mask was needed as i didnt need to be too accurate. I animated the mask path in accordance to the time of the clip to keep the pole out of the shot.
And voila, the footage is now ready for a new background.
A summary of the stages:
To further develop this i decided to integrate her into a background. In order to do so i had to track the footage first, seeing as it wasn't a complicated shot i just used the 2D tracking plugin available in after effects.
The issue with this shot would be the fact that its a close shot. That would cause parallax problems and cause the background to look out of sync with the foreground, like the following result.
So to overcome this rather, rather than tracking using the scale feature in after effects, I tracked just the position. The only usefulness of using scale would be to integrate something into the foreground.
After accomplishing the right track data, I had created a simple background, adjusted the lighting and did a colour correct to blend everything together.
Here is the final:
Process:


No comments:
Post a Comment